Ingredients for Cream Toast: High-gluten flour 500g, high-sugar yeast powder 5g, milk powder 20g, cream 215g, eggs 2, milk 100g, salt 6g, white sugar 75g.
Method:
Step 1: Place all ingredients into the mixing bucket, with liquid materials chilled in advance. The total amount of egg liquid and milk should be 200g, adding eggs first, then milk. The recipe yields two 450g loaves; for one, halve the ingredients.
Step 2: Utilize an ice pack to effectively control the dough temperature. In summer, it’s necessary to bake bread with air conditioning.
Step 3: Mix the ingredients on a low speed (2) to form a dough, then switch to a higher speed (4) to knead.
Step 4: After 10 minutes of kneading, the dough should be smoother and a rough membrane should have formed. The ideal dough temperature for removing from the machine is 24-26 degrees Celsius; this time it was 26.9 degrees, slightly higher. At this point, you can place the dough in a plastic bag, flatten it to increase volume, and freeze for 20 minutes to cool down.
Step 5: Continue to beat for 5-10 minutes after taking out, until the dough is smooth and not sticking to the bucket walls. The dough temperature may rise again, but it’s not a concern as long as it’s slightly higher than the kneading temperature.
Step 6: Stretch the dough to form a thin film that can show fingerprints, with smooth edges and no serrated shapes.
Step 7: Round the dough.
Step 8: Cover with plastic wrap and place in the oven to proof at 28 degrees Celsius for 60 minutes. In summer, you can proof at room temperature.
Step 9: If the indentation made by a finger in the dough does not retract or collapse, the dough is ready.
Step 10: Flatten the dough and divide it evenly into six parts, each about 165g.
Step 11: Roll each piece into a round shape, cover with plastic wrap or a bowl, and let it rest for 15 minutes.
Step 12: Take a piece of dough, flatten it, and stretch it into a tongue shape.
Step 13: Flip the dough, with the smooth side down, fold both sides to the center, and roll it out.
Step 14: Gently roll it up from top to bottom.
Step 15: Do not roll it too tightly or too loosely.
Step 16: Place it into a 450g loaf pan.
Step 17: Place a baking tray with hot water at the bottom of the oven to increase humidity. Put the loaf in the oven and proof at 35 degrees Celsius until it’s 80% full. My oven took 75 minutes, but some may take 90 minutes or longer. The second proofing time is not fixed; it depends on the dough’s fermentation state.
Step 18: Remove the loaf, put on the lid, and after preheating the oven to 180 degrees Celsius, continue to bake at 180 degrees for 40 minutes. This time is for reference only; some ovens may be ready in 28 minutes once the color is achieved. At 28-30 minutes, you can quickly lift the lid a little to check the color. If the color is not satisfactory, continue baking until it is, but do not exceed 40 minutes.
Step 19: After removing the toast box, gently shake it twice to release the steam, preventing the toast from shrinking and collapsing. Quickly open the lid and pour out the bread onto a cooling rack, allowing it to cool down to 27-32 degrees Celsius. Once warm, store it in a bag.
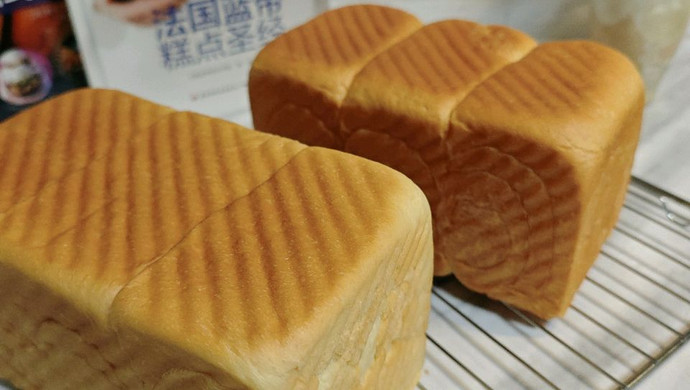
Step 20: The same recipe, same dough, and same temperature can yield different coloring effects when using different molds. This time, the toast baked in the gold wave mold came out lighter, while the black wave mold produced a slightly darker color.
Step 21: The toast is delicate and soft with a good shredding effect, making it enjoyable to eat by hand-tearing!
Cooking Tips for Cream Toast:
1. This toast has a high content of cream, resulting in a rich, creamy flavor, so there is no need for butter. Eggs, milk, and cream should all be refrigerated in advance; in the summer, when temperatures are high, it is best to freeze the milk to a slushy consistency.
2. Toast is baked at a low temperature and slow-roasted, but the baking time should not exceed 40 minutes. If the toast’s coloring is not satisfactory, you can increase the baking temperature, but do not extend the baking time. Over time, the toast will become dry and hard.
3. The toast should be cooled to around 27-32 degrees Celsius before being packaged and bagged. If the temperature is too high, excess moisture cannot evaporate, which can dampen the bread and affect its texture; if the temperature is too low or left exposed for too long, moisture can easily evaporate, causing the toast’s texture to dry out, age prematurely, and become dry, affecting the taste.
4. Store bread at room temperature; if not consumed within a short period, it can be frozen for two to three months. When ready to eat, you can reheat it in a microwave or re-bake it. Remember, do not refrigerate, as it will accelerate the aging of the bread.
There are tricks to making delicious dishes, and each of my recipes has its own little secret. You can search for ‘Lu Cuisine’ to directly view my collection of recipes!